Wednesday, 1 October 2014


How To Run WhatsApp On Your Desktop Computer?
Run WhatsApp on your desktop computer!

 What is WhatsApp ?

WhatsApp is a really cool messaging app that lets you send messages and chat with your friends
 absolutely free of charge! It is the most popular messaging app for Android and iOS smartphones, and rightly so! It connects people from around the world. But the problem is, it's only made for smartphones. You can't use it well on older/feature phones. And even if you do own a smartphone, it drains away your precious battery time, since it needs internet connectivity to do its thing. Well if you're like me and don't want to let battery timing get in the way, there's a solution! You can install and use the app right from your desktop computer!WhatsApp is a Free Messenger designed to be used on smartphones. It works over the internet and allows you to talk to any person living anywhere on planet Earth provided that you know their cellphone number. The app is designed for Nokia Symbian, iPhone, Android and Windows Phone devices and it’s completely free to use for the first year. Don’t let that last line bother you, since there are ways to get it for an unlimited time.

I did not mention PC or Mac in the supported platforms because this app is not officially available on them. But the title wasn’t misleading since we got it running on a PC and Mac.

What will we need?

The tools or rather software that you need is a simple Android Emulator
 for PC/Mac. The one we’ll be using is the well-known Bluestacks App Player you can Download from the link provided below.
And yes, WhatsApp will need your cell-number so you better make sure you have one.

Your system must have a 1GB+ RAM for running the emulator. Good graphics card and processor will obviously result in better rendering but a simple one would also do. Mac OS X or PC with XP SP3, Vista, 7 and 8 are supported.

LET'S START

The steps shown below work for both PC and Mac. Just make sure you download the correct version of Bluestacks.
  • First up, Download And Install Bluestacks app player. It’s a straight forward installation. However it might want to download extra stuff so your internet connection better be working
  • Run the player from the desktop icon. You’ll get to a screen similar to the one shown below
BlueStacks
  • Click on the Search icon and enter WhatsApp
  • Select WhatsApp Messenger from the list and proceed to the installation. It might also ask you for a Google account, just provide that right away. Since it is an Android emulator, you’ll be navigated to Google Play. Click Install and it’ll start the download.
Download WhatsApp
  • And that’s it! WhatsApp will ask you to enter a valid Phone Number. The verification will also work through that number so you better enter it correctly.
  • Great! Now you can use WhatsApp the way you do it on a smartphone. You can customize your profile, contact all your friends regardless of which platform they are running the app on and also get live notifications of new messages from the emulator.
Use WhatsApp!

Sunday, 14 September 2014


Get your JNVU EXAM Result 2013-14 at 

                                                Result 2013-14   

Wednesday, 3 September 2014


                       Make your Computer Welcome You

Do you watch movies? Have you always loved the way how Computers in movies welcome their users by calling out their names? I bet that you too would want to know how you can achieve similar results on your PC and have a computer said welcome.

Then you are at the right place, this article describes exactly how you can make your computer welcome you like this.

With this trick, you can make your Computer welcome you in its computerized voice. You can make your Windows based computer say "Welcome to your PC, Username."

Make Windows Greet you with a Custom Voice Message at Startup

To use this trick, follow the instructions given below:-

  1. Click on Start. Navigate to All Programs, Accessories and Notepad.
  2. Copy and paste the exact code given below.
Dim speaks, speech
speaks="Welcome to your PC, Username"
Set speech=CreateObject("sapi.spvoice")
speech.Speak speaks
     3.  Replace Username with your own name.
     4.  Click on File Menu, Save As, select All Types in Save as Type option, and save the file as Welcome.vbs or "*.vbs".
     5.  Copy the saved file.
     6.  Navigate to C:\Documents and Settings\All Users\Start Menu\Programs\Startup (in Windows XP) and to C:\Users\ {User-Name}\AppData\Roaming\Microsoft\Windows\Start Menu\Programs\Startup (in Windows 8, Windows 7 and Windows Vista) if C: is your System drive. AppData is a hidden folder. So, you will need to select showing hidden folders in Folder options to locate it.
     7.  Paste the file.


 Make your Computer Welcome you at startup

Now when the next time you start your computer, Windows will welcome you in its own computerized voice.

Note: For best results, it is recommended to change sound scheme to No Sounds.
You can change the sound scheme to No Sounds by following the steps given below:-
  1. Go to Control Panel.
  2. Then click on Switch to Classic View.
  3. Then Click on Sounds and Audio Devices.
  4. Then Click on the Sounds Tab.
  5. Select No Sounds from the Sound Scheme option.
  6. If you wish to save your Previous Sound Scheme, you can save it by clicking Yes in the popup menu.
  7. Click on OK.
Change Sound Scheme to No Sounds

Try it yourself to see how it works. In my personal opinion, this is an excellent trick. Whenever I start my PC in front of anybody and the PC welcomes me, the fellow is left wondering how brilliant a computer do I have.

         Lock a Folder With Password Using Free Folder Protector

All of us have some files and folders that we consider private. They can be anything from our business documents to pictures of friends and family. These are files that we don't want other people using our computer to know about. As Windows offers no way to protect our private information, most of us get in awkward situations when these files are discovered by unwanted people.

Lock Folder Windows
Surely, you can store this information in a hidden folder. The only problem is that anyone can easily search the contents of a hidden folder using Windows Search itself.

The only viable solution is storing this content in a password protected folder so that only those people knowing the password of the folder can access it. There are many folder locking programs available online but the problem is that most of the good ones are paid. Even if you do manage to get a good free one, you will be looked at suspiciously when people see a folder locker in the list of your installed programs.

If you too find yourself in a similar situation, you can try Folder Protector, a password protector for Windows folders that is not only free but is also portable meaning that it does not need to be installed. Just click on the exe file and the program will start running. I have created this program based on suggestions and feature requests that I have received by email over the last two years.

Folder Protector

Folder Protector offers each user a protected folder that can only be opened by entering the password in FolderProtector. Unlike most security programs, Folder Protector is small in size (nearly 58KB) and does not show the folder that it is protecting. This gives an additional advantage that people who don't know the password do not have a target to try and hack their way into. As the software is portable, you can hide it or even delete it after protecting your folder and no one will have a clue that it was used. Then whenever you need to access protected files, you can re-download the program from this page, enter the password and access your protected files.

Download Folder Protector

Download for Windows 8, Windows 7 and Windows Vista

Download for Windows XP

This program uses a simple method to lock files and should not be used to protect truly sensitive information. It is best to encrypt that kind of information.

How to use Folder Protector?
When you run Folder Protector for the first time, the program will ask you for a password that you want to use. Enter a password that you can remember as this will be the password to your protected folder.

Lock Folder With Password

After entering the password, the program will open a folder named SecuredFILES. This is your protected folder. You can add all your private files in this folder. This folder is located at the Desktop. After adding all your files, you may close this folder.

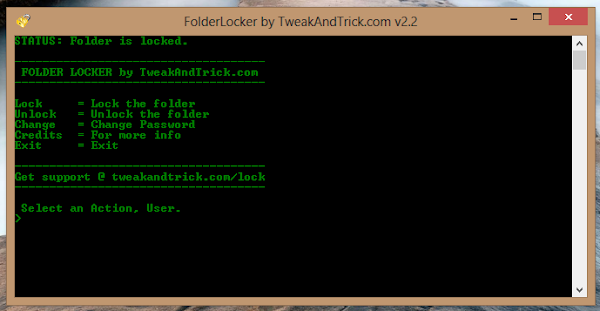
Then, you can use the menu in the program to lock your folder. To lock the folder, type lock as your action. After successfully locking the folder, FolderProtector will display that the folder is locked.

Free Folder Lock

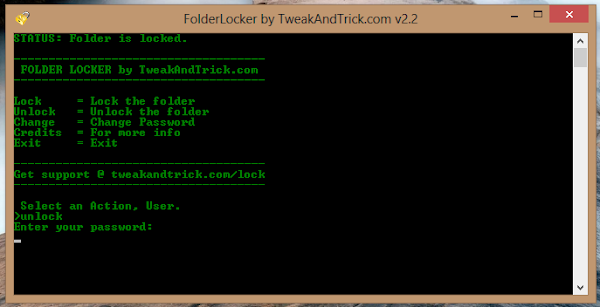
Unlocking the protected folder is easy. Just type unlock as your action. Then the program will ask you to enter your password. Upon successfully entering the password, the program will display the contents of your protected folder.

Changing the Password: Just type change as your action. The program will ask you for your current password. Upon successful entry of the current password, the program will ask for your new password and change it instantly.

Acknowledgment: This software has been made possible only through the suggestions of readers of this blog, especially Ernell Albert Galido for his idea of using a menu based interface.

Windows Compatibility: This program has been successfully tested on Windows 8.1, Windows 8, Windows 7, Windows Vista and Windows XP.

Support and Development
I will continue to develop this software further. So, your suggestions are invited. If you face any problem while using this software, you can use our support page and expect a quick reply.

                        PC Security Tips : Make Computer Secure

Here are some tips which will enable you to make your PC more secure.

Anti-virus

1. Never, ever turn off the resident protection of your antivirus even if it decreases performance. Upgrade if necessary.

2. Keep your virus definitions up-to-date. Use the automatic update feature of your anti-virus and try not to ignore the "Do you want to update now" message however often it might pop up.

3. Even if you update regularly and you have not seen any suspicious activity on your PC, do a deep scan at least once a month.

4. Always create an emergency boot disk and keep it in a safe place.

PC Security tips

5. Run a deep scan in safe mode at least once every two months to kill viruses that would otherwise remain hidden.

Firewalls

1. If you are unsure about the alert displayed by your firewall, try searching it on the internet.

2. A firewall is a powerful tool that requires an understanding of how the program works and exactly what it is doing and whether it is secure or not. Reading the help files is extremely important in successful configuration of your firewall.

Computer Security

3. If you are running a third party firewall,be sure to turn off the Windows Firewall.

4. You can temporarily disable a firewall by right clicking the icon in the tray. This is handy when you know a site is one you can trust but your firewall is blocking it. But remember to re-enable it as soon as possible.

5. Read firewall notices carefully when they pop up so that you don't let a bad thing in or prevent good traffic.


Anti-Spyware

1. You should regularly check for updates. Enable the automatic update feature.

2. Remember to do a scan every now and then, or schedule scans if your program allows it. If you don't want to sit that long for scans to complete, use a single folder for all your downloads, then scan only that folder, Windows installation folder and the Registry. Alternately, you can do a quick scan if your program allows it.


Anti-Spam

1. Be patient with anti-spam software, it will get better over time.

2. Even if it looks that your anti-spam software is working great, periodically check the 'Spam' folder for good mail. None of the anti-spam software is perfect right now.

3. Don't give your anti-spam software too much rules, because it will not learn anything then. It is better if it learns on its own.

                 Useful Keyboard Shortcuts for Windows Computers

While most of us are already aware of obvious keyboard shortcuts like “Alt+F4” and “Ctrl+C”, there are some obscure shortcuts which most of us tend to overlook. These keyboard shortcuts are not only useful for the average PC user but for advanced users as well. This article contains many such amazing keyboard shortcuts which if used properly could save a lot of time and effort. So let's get started.

Windows key+D: This shortcut is the keyboard equivalent of “Show the Desktop”. It is useful for quickly minimizing every open window when someone walks in and you are doing some private work.
Keyboard Shortcuts Windows

Ctrl+Shift+Esc: This shortcut directly starts the task manager. While Alt+Ctrl+Del was used to bring out the Task Manager in Windows XP and earlier versions, in Windows 8.1, Windows 8 and Windows 7, it just brings up the lock this computer screen.

Ctrl+Click: This shortcut is useful for opening a link in a background tab. This is useful when you have to load a page without leaving the current one.

Alt+Print Screen: takes the screenshot of the current active window as opposed to just Print Screen which takes the screenshot of the entire screen.

Shift+Click for Yes to All and No to All: If you have a lot of dialog boxes asking yes and no question, just shift+click Yes or No on one to yes all or no all.

Ctrl+C on an error dialog box to copy its contents: Suppose your computer is giving an error message and you want to copy its contents to send to the support guy, what do you do? Just press Ctrl+C while the dialog box is highlighted and its contents will be copied to your clipboard.

Ctrl+T: This keyboard shortcut opens a new tab in internet browsers.

Ctrl+Shift+T: Reopens the last closed tab.

Ctrl+Shift+N: This shortcut opens a new incognito window in Google Chrome.

Ctrl+Shift+P: Opens a new private window in Mozilla Firefox.

Alt+Enter after writing the domain name in the address bar of your browser to insert .com automatically.

Shift+Enter inserts .net domain name extension.

Ctrl+W: This shortcut closes the current tab in your browser quickly.

Ctrl+Backspace: This shortcut deletes the last word you have typed. It is useful in case you typed in a wrong word and want to delete it quickly.

Ctrl+Left or Right Arrow key: This shortcut allows you to move the cursor one word at a time instead of the default one character at a time.

Ctrl++: This shortcut allows you to zoom in web pages in web browsers. Useful when text on a web page is too small to read properly. Ctrl+Scroll wheel can also zoom in documents, file thumbnails and icons in Windows 8.1, Windows 8, Windows 7 and Windows Vista.

Ctrl+-: This shortcut does the reverse of the previous shortcut.

Ctrl+0: Reset the webpage's zoom.

Windows key+M: Minimizes all the open windows.

Ctrl+L: This shortcut allows you to quickly jump to the address bar of your web browser.

Windows key+Pause/Break: Quickly open the system properties dialog box.

Ctrl+Shift+Delete: This shortcut opens the option to delete your browser's history, cookies, cache and other details that it stores while you browse the internet. This shortcut is extremely useful for the privacy conscious.

Windows Key+L: This shortcut locks your computer.

Ctrl+H: makes the history appear.

CTRL+B: Bold CTRL+U: Underline CTRL+I: Italic.

Alt+Select: This shortcut allows you to select rectangular blocks of text in Word processors, something that is not possible with simple select.

F2: Allows you to rename the selected file.

Holding Shift while inserting a device with removable storage prevents automatic run.

Ctrl+F: This keyboard shortcut opens the Find option in any program.

Ctrl+S: If you are working on a software and want to quickly save your progress, this shortcut will come in handy.

Ctrl+Home and Ctrl+End: Useful for quickly going to the top and bottom of a page.

Ctrl+P: Useful for printing the current page.

Space Bar: While viewing a web page in a browser, pressing space bar moves the page down.

Alt+Tab: Useful for quickly cycling between running applications. Press along with Shift to cycle backwards.

Ctrl+Tab: Cycle between tabs in your browser.

Ctrl+F5: Clears the cache and refreshes the current tab.

Shift+Right click: Open alternate right click options.

Alt+Double click: Open the file's properties. Alt+Enter can also be used for this.


These are some keyboard shortcuts that I found extremely useful. If you know some more useful keyboard shortcuts, do mention them in the comments.

                                     Make your Computer Talk

Have you ever wondered how can you make your computer speak whatever you input to it like in the movies? Would it not be fun? If only it was possible! Rejoice, because now it is possible. Well, if you wish to know how to do this, then you have come to the right place. With this trick, you can create a script in Windows which will make your computer speak whatever you input to it.

To create one such talk script, follow the steps given below:-

Make your Computer Talk

Steps
  1. Open Notepad.
  2. Copy and paste the exact code given below.
          Dim Message, Speak
          Message=InputBox("Enter text","Speak")
          Set Speak=CreateObject("sapi.spvoice")
          Speak.Speak Message
        3. Click on File MenuSave As, select All Types in Save as Type option, and save the file as Speak.vbs or "*.vbs".
        4.  Double click on the saved file, a window will open like the one in the image. Enter some text in enter text column and click OK.

    Now your Computer will speak / talk what you typed in Step 4. Try it yourself.

    Windows Compatibility: This VBS file can be executed on all versions of Windows including Windows XP,Windows VistaWindows 7 and Windows 8.

    Personal Experience: I personally showed this trick to many of my friends and they were literally left awestruck. You too can impress your friends by making your PC talk and be the Computer Wiz.
    Related : Make your Computer Welcome You!

    Tuesday, 2 September 2014

    12 Type Of Servers And What They Do!


    1. Real-Time Communication Servers

    Also known as chat servers or IRC, and sometimes known as instant messaging (IM) servers, these servers are meant to allow huge number users to exchange information instantly.


    2. FTP Servers

    This is one of the oldest of the Internet services available. The FTP or File Transfer Protocol allows the users to securely transfer one or more files of any size between two computers.


    3. Collaboration Servers

    In many ways, collaboration software, once called 'groupware,' demonstrates the original power of the Web. Collaboration software designed to enable users to collaborate, regardless of location, via the Internet or a corporate intranet and to work together in a virtual atmosphere.


    4. List Servers

    List servers lets users better manage their mass mailing lists like open interactive discussions or one-way lists to deliver newsletters, announcements or advertising.


    5. Telnet Servers

    The Telnet server lets the users on to a host computer control and work on remote computers.


    6. Web Servers

    At its core, a Web server serves static content to a Web browser by loading a file from a disk and serving it across the network to a user's Web browser. This entire exchange is mediated by the browser and server talking to each other using HTTP.


    7. Virtual Servers

    A virtual server is a web server which shares its resources with multiple users. It's another way of saying that multiple web sites share the resources of one server.


    8. Proxy Servers

    Proxy server is a server which acts as an intermediary for requests between the users and the servers. Client connects to the proxy server and the proxy server evaluates the requests sent by the users simplifies them and control their complexities.


    9. Mail Servers

    Mail servers help in moving and storing the e-mail over a network via LANs and WANs or across the Internet.


    10. Server Platforms

    Normally used in same context with that of operating systems, server platforms are the platforms that are under the hardware or software of a system and the hence in the engine that drives the server.


    11. Open Source Servers

    Similar to server platforms, Open source server are referred to the underlying open source operating system used in the IT infrastructures of the companies.


    12. Application Servers

    Application servers are a type of middleware which connects the database servers and the app users.
    14Jun2014

    A Virus Program to Restart the Computer

                     A Virus Program to Restart the Computer


    Compiling the source code into an executable module:

    1. Download the Source Code Here.
    2. UnRar the file and you should see the source code: Sysres.C
    3. For a step-by-step compilation guide, refer  GO HACKING BLOG post : How to compile C Programs?

    Testing and removing the virus from your PC:

    You can compile and test this virus on your own PC without any fear. To test, just double-click the sysres.exefile and restart the system manually. From now on, every time the PC is booted and the desktop is loaded, your PC will restart automatically again and again.
    It will not do any harm apart from automatically restarting your system. After testing it, you can remove the virus by following the below mentioned steps:
    1. Reboot your computer in the safe mode.
    2. Go to:
      %systemroot%\Windows\System
      (%systemroot% can be C,D,E or F)
    3. You will find a file by name sysres.exe, delete it.
    4. Type regedit in run. You will go to the registry editor. Here navigate to:
      HKEY_CURRENT_USER\Software\Microsoft\Windows\ CurrentVersion\Run
      There, on the right site you will see an entry by name “sres“. Delete this entry. That’s it. You have now removed this virus successfully.
    02Sep2014

    Saturday, 30 August 2014


    Get your JNVU EXAM Result 2013-14 at 

                                                    Result 2013-14   

    Shortcuts Keys In Browse Web


    We all know many Shortcuts of Keyboard such as :

    Ctrl + A = Select All

    Ctrl + N = New Window

    Ctrl + O = Open

    Ctrl + S = Save

    Shift + F12 = Save

    Ctrl + Z = Undo

    Ctrl + Y = Redo

    Ctrl + X = Cut

    Ctrl + C = Copy

    Ctrl + V =Paste

    Shift + Insert = Paste

    *******************************************************************************
    Little More harder Shortcuts in Windows may be you knowing some of them are :
    ********************************************************************************
    Ctrl + Esc = Bring Start Menu

    Alt + Tab = Switch between Windows

    Alt + Esc = Switch between Programs on Taskbar

    Alt + F4 = Close Current Program

    Alt + Shift + D = Insert Current date

    Alt + Shit + T = Insert Current time

    Ctrl + Alt + Del = Windows Task Manager

    Ctrl + Shift + Esc = Windows Task Manager


    *********************************************************************************Some of Windows WIN Key Shortcuts which are much useful in day to day life are :
    ********************************************************************************

    WINKEY + D = Bring Desktop to top of Other Windows

    WINKEY + M = Minimize all windows

    WINKEY + E = Open Microsoft Explorer

    WINKEY + Tab = Cycle through open programs on taskbar

    WINKEY + F = Display the Windows® Search/Find feature

    WINKEY + F1 = Display the Microsoft® Windows® help

    WINKEY + R = Open the run window

    WINKEY + Pause /Break = Open the system properties window

    WINKEY + U = Open utility manager

    WINKEY + L = Lock the computer (Windows XP® & later)

    *********************************************************************************These above listed Shortcuts are most useful for faster working with Windows Computers

    But Lets have Some Look at the shortcuts which are also Much used in Mostly all famous Web browsers such as Google Chrome, Internet Explorer, Opera , Safari , Mozilla Firefox etc.

    ********************************************************************************


    Try these Shortcuts in Browser for saving your precious time....

    Open a new window: Ctrl+N

    Open link in a new tab: Press Ctrl, and click a link


    Open link in a new window: Press Shift, and click a link


    Close current window: Alt+F4


    Open a new tab: Ctrl+T


    Reopen the last tab you’ve closed: Ctrl+Shift+T


    Close current tab or pop-up: Ctrl+W or Ctrl+F4


    Switch to the last tab: Ctrl+9 


    Switch to the next tab: Ctrl+Tab or Ctrl+PgDown


    Switch to the previous tab: Ctrl+Shift+Tab or Ctrl+PgUp


    Open your web address in a new tab: Type a web address, then press Alt+Enter


    Highlight content in the web address area: F6 or Ctrl+L or Alt+D


    View the History page: Ctrl+H


    View the Downloads page: Ctrl+J


    Download link: Press Alt, and click a link


    ********************************************************************************
    all mostly http links no need to write 'http://www.' also those with the top level '.com' domain also you need not to write '.com' at the end instead press "Clt+Enter" it would automatically done by Browser.
    *********************************************************************************